
Composing, or writing your own music is an absolutely fantastic thing for your child to do to help them with their creativity and self-expression. Many people, especially in teenage years, go through times when they want to write their own music – maybe they want to write a piece of music for themselves to play, maybe they want to write a song, maybe they have dreams to become a recording artist. Learning how to compose is part of the curriculum on a music course, but what if they wanted to top this at home rather than at school. maybe they don’t want to write the sort of music their school is encouraging them to write.
One of the hardest things with any form of creative self-expression where you are putting something down on paper, whether that be writing a story, or painting, or music composition is looking at a sheet of paper you haven’t yet written on and working out how on earth to start. You could try making one of these DIY spinners for your child to start their composition, taking some of the pressure off them when they are staring at a blank piece of music manuscript. Well not entirely blank of course, the stave will be there, but you know what I mean. Hopefully.

How does the musical spinner work?
The spinners I have made are rhythm pattern spinners. I made 3 of them, one for pieces in 4/4 time (so pieces that have 4 beats in a bar), one in 3/4 time (there would be 3 beats in a bar in this one), and one in 2/4 (yes, you guessed it, these would have 2 beats in a bar).
To choose one of the rhythm patterns, you would simply spin the spinner and wait to see where it lands and use that rhythm pattern for your first bar of music. Pick some notes to go with that rhythm pattern, then spin again to see what it lands on for the second bar, and so on until either you finish your piece, or your have maybe a musical phrase, or few phrases, you like.
The point of this exercise is to just get you started; a fun way to write the first few bars of a piece maybe. Or maybe even to use on the first sheet within a music manuscript book, so you already have your first piece in the manuscript book and the next piece is easier to write.
How to make the musical spinner
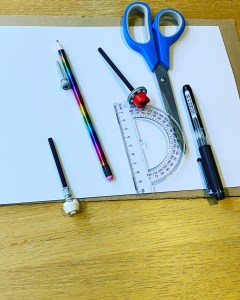
This is a really easy DIY to make. Gather the following items together:
- A piece of paper
- Some cardboard
- A pencil
- Something to draw a circle with (unless you are one of those amazing people who can draw a perfect circle just like that), I used a protractor, but it could have been the lid from a jar for example
- A black pen to go over the notes you draw on your paper (optional)
- Some glue, I used a Pritt Stick
- Scissors
- Something to use as the middle part, or spindle (if that is the correct word for it) of your spinner
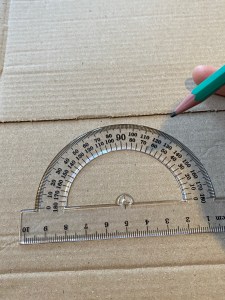
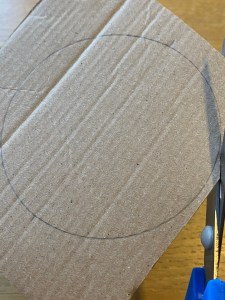
Once you have gathered your supplies together draw a circle on the paper and card using your protractor, or whatever you choose to help you make the circle. Then cut out both the paper and cardboard circle and glue the paper circle onto the cardboard one, just to give your spinner a little structure and help it to spin properly. You could, if you choose, just use the cardboard circle, but I personally thought it looked better using the plain paper.

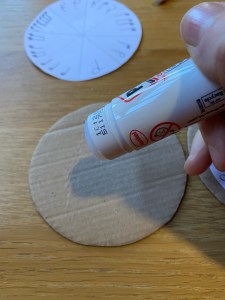
Use either the straight part of your protractor, a ruler or draw freehand, to draw 4 lines across the circle giving you 8 sections to your circle. In each section draw a rhythm pattern to use in your music. I chose to have a time signature in my head when drawing the rhythm pattern so that each section would represent one bar of music. You will need to know enough about music to draw in those rhythm patterns, but they do not need to be complicated at all. Each section could have a different rhythm pattern in it or you could pick, say, 2 rhythm patterns and alternate them. If you would like to know more about time signatures or music notation so that you can do this, let me know and I can write a blog post about this in the future. I chose to go over my music notation that I had written on the spinner in a black pen so it was easier to see.

I then poked a hole in the middle of the spinner and pushed my spindle through that hole. I used a lego rod and some almost conical shaped lego pieces for one of my spindles (it is very useful having a son who loves legal at times!), another lego rod with a cylindrical shaped leg piece on the end of it for a second spinner, and a short pencil crayon for the third. All three spinners worked very well, exactly as I wanted them to work – I did try one spinner with a longer pencil, but the long pencil was too top heavy and the spinner did not spin at all.
I haven’t tried to get my children to use the spinners for music composition yet (though my youngest does very much enjoy the spinner itself), as I feel they are a little too young at the moment to use this game for their composition. If I do get them to have a go at it in the next few weeks I will let you know how we get on. As I said, your child needs enough knowledge of rhythm patterns, music notation and music theory to be able to use the spinner. So I would recommend this game for children probably aged 9 for 10 upwards who have been playing a musical instrument for a year or two already and understand the basics of music theory – how is a bar made up, what are each of the different lengths of notes called etc.
I made a TikTok video of the whole process of making the spinner, so you can see how I made one of them by clicking on the link below:
https://vm.tiktok.com/ZMYR9gyuD/
If you have enjoyed reading my blog post, thank you. I am always looking for ideas for the blog, so would love to hear from you with suggestions for topics you would like me to cover in the future. Also, if you would be interested in supporting me to keep this blog running, buying the books to review here, and supplies to make the DIY instruments, for example, I would be absolutely delighted if you would consider buying me a coffee using the following link: Buy Me A Coffee Thank you!!

Leave a comment